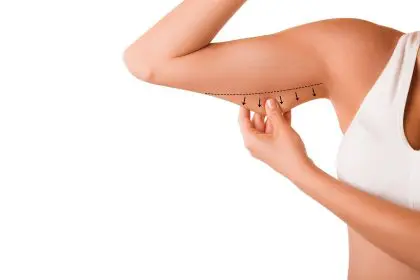
That frustrating underarm wobble – affectionately nicknamed “bat wings” – ranks among the most common body concerns for people of all fitness levels. The technical term is tricep brachii, the three-headed muscle making up about 70% of your upper arm’s mass. When this area lacks tone, gravity takes its unforgiving toll, creating that characteristic loose, hanging tissue that many find bothersome, especially during warmer months when sleeveless clothing becomes the norm.
While push-ups effectively target this area, they present genuine challenges for many. Wrist discomfort, shoulder mobility issues, and upper body strength limitations can make traditional push-ups frustrating or even impossible. The good news? A well-developed arsenal of alternative exercises can transform this stubborn area without requiring a single push-up.
These specialized movements isolate the triceps from multiple angles while remaining accessible to various fitness levels. Combined with smart nutrition strategies, these exercises create the defined, toned arms that boost confidence in everything from formal wear to casual t-shirts.
The overhead tricep extension for deeper muscle engagement
This fundamental movement targets the long head of the tricep, the portion most responsible for that coveted horseshoe shape at the back of the arm. Unlike push-ups, which distribute effort across multiple muscle groups, this exercise isolates the triceps with laser-like precision.
Begin seated or standing with feet shoulder-width apart for stability. Hold a single dumbbell or kettlebell with both hands, gripping the weight’s sides rather than the handle for better control. Extend the weight overhead with arms fully straight, then slowly lower behind your head by bending at the elbows while keeping upper arms stationary. When the weight reaches the base of your neck, pause briefly before extending arms back to starting position.
The effectiveness hinges on maintaining proper form: keep upper arms close to your ears throughout the movement, engage your core to prevent arching your back, and control the weight during both lifting and lowering phases. Start with 3 sets of 10-12 repetitions, using a weight that challenges you by the final repetitions without compromising form.
For beginners, this movement can begin without weights, simply pressing hands against resistance bands or even empty-handed to master the motion. Advanced exercisers might progress to single-arm variations, creating greater stability challenges while ensuring balanced development on both sides.
Unlike push-ups, which can place considerable pressure on wrists, this overhead movement keeps wrists in a more neutral position while still thoroughly engaging the triceps. The vertical alignment also minimizes shoulder strain while maximizing the stretch-contraction cycle that stimulates muscle development.
The tricep dip for functional strength
Tricep dips recreate many push-up benefits without requiring you to support your entire body weight on extended wrists. This movement builds practical strength for everyday pushing motions while specifically targeting the triceps that control arm extension.
Find a sturdy chair, bench, or dedicated dip station. Sit at the edge with hands gripping the edge beside your hips, fingers pointing forward. Walk feet forward and lift your body slightly off the surface. Lower your body by bending your elbows to about 90 degrees, keeping them pointing backward rather than flaring outward. Press through your palms to return to the starting position, focusing on engaging your triceps rather than pushing through your shoulders.
The movement intensity easily adjusts to different fitness levels. Beginners can keep feet closer to the body for more support, while advanced exercisers might elevate feet on another surface or even extend them straight for maximum challenge. For those with wrist sensitivity, placing hands on a cushioned surface or wearing compression gloves can provide comfort without sacrificing effectiveness.
To maximize results while minimizing joint stress, maintain proper alignment throughout: keep shoulders down away from ears, chest lifted, and avoid leaning forward which transfers work to the chest muscles. Aim for 3 sets of 10-15 repetitions, increasing difficulty by slowing the lowering phase to 3-4 seconds once standard repetitions become comfortable.
For extra motivation, track your progress by timing how long you can hold the bottom position of the dip. Improvements in this “static hold” directly correlate with developing firm, functional arm strength that translates to reduced underarm wobble.
The kickback for upper arm definition
Tricep kickbacks specifically target the medial and lateral heads of the muscle, precisely addressing the areas most visible when arms hang naturally at your sides. This exercise creates that coveted toned appearance along the back of the arm without requiring any pushing motions.
Begin in a split stance with one foot forward for stability, or place one knee and hand on a bench in a three-point stance. Hold a dumbbell in your free hand with your elbow bent at 90 degrees and tucked close to your ribcage. Keeping your upper arm parallel to the floor, extend your forearm backward until completely straight, squeezing your tricep at the top of the movement. Slowly return to the starting position while maintaining control.
The effectiveness depends on isolation: keep your upper arm absolutely stationary throughout the movement, as any swinging motion reduces tricep engagement. Many beginners mistakenly use momentum rather than muscle to move the weight. Start with lighter weights to master proper form: 3 sets of 12-15 repetitions per arm with perfect execution creates better results than heavier weights with poor technique.
For enhanced results, incorporate a brief pause at full extension, consciously contracting the tricep muscle for 1-2 seconds before lowering. This “peak contraction” technique stimulates greater muscle fiber recruitment and accelerates toning.
A resistance band version offers an excellent alternative for travelers or those without dumbbells. Stand with one foot on the band’s center, grip both handles, and perform the same movement against the band’s tension. The variable resistance throughout the range of motion creates a unique challenge that many find even more effective than weights.
The lying tricep extension for maximum stretch
Also known as skull crushers (though we’ll avoid that intimidating name), this exercise provides exceptional tricep isolation while supporting your spine and shoulders in a stable position. This movement creates an optimal stretch at the long head of the tricep – crucial for addressing the full length of tissue that comprises “bat wings.”
Lie flat on a bench or the floor with feet planted firmly. Hold dumbbells or a barbell with hands shoulder-width apart, arms extended perpendicular to the floor. Keeping upper arms stationary, bend at the elbows to lower the weight toward your forehead. When elbows reach slightly below 90 degrees, press the weight back up by engaging your triceps.
Form considerations make all the difference: keep elbows pointed forward rather than flaring outward, maintain wrists in a neutral position, and avoid arching your lower back off the support surface. For wrist comfort, an EZ curl bar creates a more natural grip angle than a straight barbell.
The exercise intensity easily adjusts for different strength levels. Beginners might start with lighter weights for 2 sets of 10 repetitions, while more advanced exercisers could progress to 3-4 sets of 8-10 repetitions with challenging weights. Unlike push-ups, where body weight determines resistance, this exercise allows precise load adjustment suited to your current strength.
For an advanced variation that further targets the stubborn underarm area, try the “pullover to extension” combination. Begin with arms extended over your chest, lower the weight behind your head in a wide arc (the pullover portion), then perform the tricep extension from that stretched position. This compound movement enhances both mobility and strength through the entire posterior arm.
The resistance band pull-apart for posterior chain activation
While primarily targeting the often-neglected rear deltoids and upper back, this movement also engages the triceps as stabilizers throughout the motion. This exercise addresses a key principle of arm toning: balanced development between pushing and pulling muscles creates the most aesthetically pleasing results.
Stand with feet shoulder-width apart, holding a resistance band with both hands at chest height, palms facing down, and arms extended forward. Maintaining straight arms, pull the band apart by moving hands outward until your arms form a T position. Squeeze your shoulder blades together at the movement’s end, then slowly return to starting position while maintaining tension on the band.
The exercise difficulty adjusts by simply changing hand position on the band – wider grip for beginners, narrower for increased resistance. Start with 3 sets of 15-20 repetitions, focusing on controlled movement rather than speed. For enhanced tricep engagement, slightly bend and then straighten your elbows during the outward pull, creating an isometric contraction that firms the back of the arms.
This movement counterbalances typical daily activities that emphasize forward positions, helping correct the rounded shoulder posture that makes arm flab more prominent. Improved posture immediately creates the appearance of more toned arms, even before muscle changes fully develop.
A towel can substitute for a resistance band in a pinch: hold a bath towel with both hands and perform the same pulling motion, creating your own resistance by pulling outward against the towel’s fabric. This equipment-free version makes a perfect addition to your travel exercise routine.
The dolphin pose for integrated arm conditioning
Drawing from yoga traditions, this static hold creates remarkable tricep engagement while simultaneously developing shoulder stability and core strength. Unlike push-ups, which press directly into wrist joints, this position distributes weight through the forearms, making it accessible even to those with wrist limitations.
Begin on hands and knees, then lower forearms to the floor with elbows under shoulders. Interlace fingers or keep palms flat and parallel. Curl toes under and lift knees off the floor, raising hips toward the ceiling to create an inverted V shape similar to downward dog, but with forearms rather than hands on the floor. Press forearms firmly into the ground while reaching heels toward the floor.
Hold this position for 30 seconds initially, eventually building to 60-90 second holds for 3-4 repetitions. The key to effectiveness lies in active pressing – rather than passively hanging in the position, continuously press the forearms into the floor while drawing shoulder blades down the back.
The beauty of this movement lies in its scalability: beginners can keep knees bent to reduce intensity, while advanced practitioners might add small pulses or single-leg variations. The exercise creates time-under-tension for the triceps without requiring repetitive motion, making it ideal for those with joint sensitivity.
For enhanced results, try alternating between dolphin pose and forearm plank, moving fluidly between the positions. This combination creates a dynamic sequence that challenges the triceps from multiple angles while building the core strength necessary for proper arm definition.
The close-grip row for tricep integration
Rows primarily target the back muscles, but the close-grip variation significantly recruits the triceps as stabilizers throughout the movement. This exercise strengthens the entire posterior chain while specifically addressing the area where “bat wings” develop.
Secure a resistance band under your feet or around a sturdy anchor point at floor level. With feet shoulder-width apart, hinge forward slightly at the hips with a flat back. Grip the band handles with palms facing each other and elbows tucked close to your sides. Pull the handles toward your lower ribcage, keeping elbows narrow and close to the body. Slowly return to the starting position with controlled movement.
The tricep engagement intensifies by focusing on three key form elements: keep elbows tucked tightly to your sides throughout the movement, fully straighten arms at the forward position, and squeeze shoulder blades together at the peak of the pull. Aim for 3 sets of 12-15 repetitions, focusing on quality over quantity.
This pulling motion balances pushing exercises, creating the balanced development necessary for optimal arm appearance. While the primary movement trains the back, the positioning specifically engages the triceps, especially during the straightening phase of each repetition.
A seated cable version at the gym provides consistent resistance throughout the range of motion, while resistance bands create increasing tension at the end range, both offering unique benefits for arm development. For home exercisers without equipment, gallon water jugs or household items with handles can substitute for weights.
The wall press for beginner-friendly tricep training
This modified push-up variation delivers similar tricep benefits without floor contact, making it perfect for beginners or those with wrist or shoulder concerns. By adjusting your distance from the wall, you precisely control the resistance, creating a perfectly scaled exercise for any fitness level.
Stand facing a wall with feet hip-width apart, placed about 2-3 feet from the wall. Place palms flat against the wall at chest height, slightly narrower than shoulder width. Bend elbows to lower your chest toward the wall while keeping elbows tucked close to your body rather than flaring outward. Press back to the starting position, focusing on engaging the backs of your arms.
The wall angle determines difficulty: standing nearly upright creates minimal challenge, perfect for beginners, while placing feet further from the wall increases the load. This adjustability makes wall presses valuable for progressive training or during rehabilitation from injuries.
For maximum tricep engagement, keep these form cues in mind: position hands at chest height rather than shoulder height, keep elbows pointing downward rather than outward, and maintain a straight line from head to heels throughout the movement. Complete 3 sets of 12-15 repetitions, advancing to more challenging positions as strength develops.
Once standard wall presses become comfortable, try the “3-point pause” technique: lower halfway and pause for 2 seconds, lower fully and pause for 2 seconds, then press back up. This variation increases time under tension, a key factor for developing muscle definition in the tricep area.
Nutrition strategies to reveal your hard-earned muscle
Exercise creates the muscle tone beneath the surface, but nutrition determines whether that definition becomes visible. Without addressing dietary factors, even the most effective arm exercises may not deliver the aesthetic results you’re seeking.
Protein intake plays a crucial role in arm definition. Aim for 0.7-0.9 grams of protein per pound of body weight daily, spread across meals and snacks. This macronutrient provides the building blocks your body needs to repair and develop muscle tissue stimulated during your workouts. Lean sources like chicken breast, fish, Greek yogurt, eggs, and plant-based options such as lentils and tofu support muscle development without excess calories.
Hydration directly impacts arm appearance. Consuming adequate water – typically 8-10 cups daily plus additional during exercise – helps metabolize fat, transport nutrients to muscles, and reduce water retention that can obscure muscle definition. Many people mistake thirst for hunger, so maintaining proper hydration also helps prevent overeating.
Strategic carbohydrate timing enhances workout performance and recovery. Focus carbohydrate consumption around your exercise sessions, when muscles most efficiently utilize this fuel source. Whole food sources like sweet potatoes, brown rice, quinoa, and fruits provide sustained energy without the inflammation associated with refined carbohydrates that can create bloating and obscure definition.
For maximum definition, consider reducing – not eliminating – overall carbohydrate intake during focused toning phases. This approach encourages your body to access fat stores while preserving muscle tissue, especially when protein intake remains adequate. This temporary adjustment works most effectively after establishing a foundation of muscle through consistent training.
Healthy fats support hormone production essential for muscle maintenance. Include sources like avocados, olive oil, nuts, and fatty fish in moderate amounts. These foods also provide satiety that helps maintain consistent energy without overeating.
Remember that spot reduction – losing fat exclusively from one body area through targeted exercise – isn’t physiologically possible. The tricep exercises in this program build muscle in the desired areas, but overall body composition changes require a comprehensive approach including proper nutrition and, for most people, some form of cardiovascular exercise to reduce total body fat percentage.
With consistent application of these specialized exercises and supporting nutrition strategies, you can transform “bat wings” into sculpted arms that boost confidence and enhance overall appearance – all without performing a single traditional push-up. The key lies in progressive overload: gradually increasing the challenge through added resistance, increased repetitions, or enhanced technique as your strength develops.